Thinking in React

One of the many great parts of React is how it makes you think about apps as you build them. In this document, we’ll walk you through the thought process of building a searchable product data table using React.
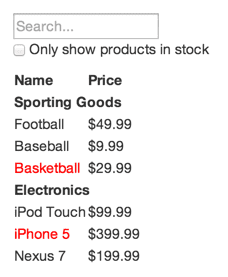
Start With A Mock
Imagine that we already have a JSON API and a mock from our designer. The mock looks like this:
 Our JSON API returns some data that looks like this:
[{category: "Sporting Goods", price: "$49.99", stocked: true, name: "Football"},{category: "Sporting Goods", price: "$9.99", stocked: true, name: "Baseball"}, {category: "Sporting Goods", price: "$29.99", stocked: false, name: "Basketball"}, {category: "Electronics", price: "$99.99", stocked: true, name: "iPod Touch"}, {category: "Electronics", price: "$399.99", stocked: false, name: "iPhone 5"},{category: "Electronics", price: "$199.99", stocked: true, name: "Nexus 7"}];
Step 1: Break The UI Into A Component Hierarchy
The first thing you’ll want to do is to draw boxes around every component (and subcomponent) in the mock and give them all names. If you’re working with a designer, they may have already done this, so go talk to them! Their Photoshop layer names may end up being the names of your React components!

You’ll see here that we have five components in our app. We’ve italicized the data each component represents.
1- FilterableProductTable (orange): contains the entirety of the example
2- SearchBar (blue): receives all user input
3- ProductTable (green): displays and filters the data collection based on user input
4- ProductCategoryRow (turquoise): displays a heading for each category
5- ProductRow (red): displays a row for each product
Step 2: Build A Static Version in React
What does it mean to build a ‘static’ version of your application?
In a statically built program, no dynamic linking occurs: all the bindings have been done at compile time. … As a result, when installing a statically-built program on a computer, the user doesn’t have to download and install additional libraries: the program is ready to run
[class ProductCategoryRow extends React.Component { render() { const category = this.props.category; return /#PURE/( React.createElement(“tr”, null, /#PURE/ React.createElement(“th”, { colSpan: “2” }, category)));
}}
class ProductRow extends React.Component { render() { const product = this.props.product; const name = product.stocked ? product.name : /#PURE/ React.createElement(“span”, { style: { color: ‘red’ } }, product.name);
return /*#__PURE__*/(
  React.createElement("tr", null, /*#__PURE__*/
  React.createElement("td", null, name), /*#__PURE__*/
  React.createElement("td", null, product.price)));
}}
class ProductTable extends React.Component { render() { const rows = []; let lastCategory = null;
this.props.products.forEach(product => {
  if (product.category !== lastCategory) {
    rows.push( /*#__PURE__*/
    React.createElement(ProductCategoryRow, {
      category: product.category,
      key: product.category }));

  }
  rows.push( /*#__PURE__*/
  React.createElement(ProductRow, {
    product: product,
    key: product.name }));

  lastCategory = product.category;
});

return /*#__PURE__*/(
  React.createElement("table", null, /*#__PURE__*/
  React.createElement("thead", null, /*#__PURE__*/
  React.createElement("tr", null, /*#__PURE__*/
  React.createElement("th", null, "Name"), /*#__PURE__*/
  React.createElement("th", null, "Price"))), /*#__PURE__*/


  React.createElement("tbody", null, rows)));
}}
class SearchBar extends React.Component { render() { return /#PURE/( React.createElement(“form”, null, /#PURE/ React.createElement(“input”, { type: “text”, placeholder: “Search…” }), /#PURE/ React.createElement(“p”, null, /#PURE/ React.createElement(“input”, { type: “checkbox” }), ‘ ‘, “Only show products in stock”)));
}}
class FilterableProductTable extends React.Component { render() { return /#PURE/( React.createElement(“div”, null, /#PURE/ React.createElement(SearchBar, null), /#PURE/ React.createElement(ProductTable, { products: this.props.products })));
}}
const PRODUCTS = [ { category: ‘Sporting Goods’, price: ‘$49.99’, stocked: true, name: ‘Football’ }, { category: ‘Sporting Goods’, price: ‘$9.99’, stocked: true, name: ‘Baseball’ }, { category: ‘Sporting Goods’, price: ‘$29.99’, stocked: false, name: ‘Basketball’ }, { category: ‘Electronics’, price: ‘$99.99’, stocked: true, name: ‘iPod Touch’ }, { category: ‘Electronics’, price: ‘$399.99’, stocked: false, name: ‘iPhone 5’ }, { category: ‘Electronics’, price: ‘$199.99’, stocked: true, name: ‘Nexus 7’ }];
ReactDOM.render( /#PURE/ React.createElement(FilterableProductTable, { products: PRODUCTS }), document.getElementById(‘container’));]
Once you have a static application, what do you need to add? set up your existing GitHub repo on Netlify for continuous deployment (that means all you have to do is push your code and Netlify will do the rest of your publishing tasks for you). If you haven’t quite discovered the amazing power of version control with GitHub you can always drag and drop your static files here (just drop your zipped files in the dashed box).
Step 3: Identify The Minimal (but complete) Representation Of UI State
o make your UI interactive, you need to be able to trigger changes to your underlying data model. React achieves this with state.
Think of all the pieces of data in our example application. We have:
- The original list of products
- The search text the user has entered
- The value of the checkbox
- The filtered list of products
Step 4: Identify Where Your State Should Live
[class ProductCategoryRow extends React.Component { render() { const category = this.props.category; return /#PURE/( React.createElement(“tr”, null, /#PURE/ React.createElement(“th”, { colSpan: “2” }, category)));
}}
class ProductRow extends React.Component { render() { const product = this.props.product; const name = product.stocked ? product.name : /#PURE/ React.createElement(“span”, { style: { color: ‘red’ } }, product.name);
return /*#__PURE__*/(
  React.createElement("tr", null, /*#__PURE__*/
  React.createElement("td", null, name), /*#__PURE__*/
  React.createElement("td", null, product.price)));
}}
class ProductTable extends React.Component { render() { const filterText = this.props.filterText; const inStockOnly = this.props.inStockOnly;
const rows = [];
let lastCategory = null;

this.props.products.forEach(product => {
  if (product.name.indexOf(filterText) === -1) {
    return;
  }
  if (inStockOnly && !product.stocked) {
    return;
  }
  if (product.category !== lastCategory) {
    rows.push( /*#__PURE__*/
    React.createElement(ProductCategoryRow, {
      category: product.category,
      key: product.category }));

  }
  rows.push( /*#__PURE__*/
  React.createElement(ProductRow, {
    product: product,
    key: product.name }));


  lastCategory = product.category;
});

return /*#__PURE__*/(
  React.createElement("table", null, /*#__PURE__*/
  React.createElement("thead", null, /*#__PURE__*/
  React.createElement("tr", null, /*#__PURE__*/
  React.createElement("th", null, "Name"), /*#__PURE__*/
  React.createElement("th", null, "Price"))), /*#__PURE__*/


  React.createElement("tbody", null, rows)));
}}
class SearchBar extends React.Component { render() { const filterText = this.props.filterText; const inStockOnly = this.props.inStockOnly;
return /*#__PURE__*/(
  React.createElement("form", null, /*#__PURE__*/
  React.createElement("input", {
    type: "text",
    placeholder: "Search...",
    value: filterText }), /*#__PURE__*/
  React.createElement("p", null, /*#__PURE__*/
  React.createElement("input", {
    type: "checkbox",
    checked: inStockOnly }),
  ' ', "Only show products in stock")));
}}
class FilterableProductTable extends React.Component { constructor(props) { super(props); this.state = { filterText: ‘’, inStockOnly: false };
}
render() { return /#PURE/( React.createElement(“div”, null, /#PURE/ React.createElement(SearchBar, { filterText: this.state.filterText, inStockOnly: this.state.inStockOnly }), /#PURE/
  React.createElement(ProductTable, {
    products: this.props.products,
    filterText: this.state.filterText,
    inStockOnly: this.state.inStockOnly })));
}}
const PRODUCTS = [ { category: ‘Sporting Goods’, price: ‘$49.99’, stocked: true, name: ‘Football’ }, { category: ‘Sporting Goods’, price: ‘$9.99’, stocked: true, name: ‘Baseball’ }, { category: ‘Sporting Goods’, price: ‘$29.99’, stocked: false, name: ‘Basketball’ }, { category: ‘Electronics’, price: ‘$99.99’, stocked: true, name: ‘iPod Touch’ }, { category: ‘Electronics’, price: ‘$399.99’, stocked: false, name: ‘iPhone 5’ }, { category: ‘Electronics’, price: ‘$199.99’, stocked: true, name: ‘Nexus 7’ }];
ReactDOM.render( /#PURE/ React.createElement(FilterableProductTable, { products: PRODUCTS }), document.getElementById(‘container’));]
Step 5: Add Inverse Data Flow
React makes this data flow explicit to help you understand how your program works, but it does require a little more typing than traditional two-way data binding.